How To Script Aseprite Tools in Lua
This tutorial introduces how to script an add-on for the pixel art editing program Aseprite. We do a series of “hello world” exercises to create dialog menus in the interface. We then look at two more in-depth tools: an object-oriented isometric grid and a conic gradient.
Unlike prior tutorials, the software discussed here is not free. As of writing, Aseprite costs $19.99 USD. A free trial is available from their website. Free variants, such as LibreSprite, exist due to an earlier, more permissive license. However, Aseprite’s scripting API is a recent addition, and so may not exist in these variants. As always, conduct comparative research prior to purchase. See, for example, this video by Brandon James Greer.
We’ll be exploring Aseprite from a coder’s perspective, not an artist’s. As such, we only address its graphical user interface indirectly. Furthermore, the results we obtain may not be in the spirit of the pixel art aesthetic. It can be helpful to observe how and why Aseprite is used before coding. MortMort provides an introduction to the software; Adam C. Younis does a good overview of pixel art itself.
More tutorial videos can be found in Aseprite’s tutorials section, here. Written information can be researched in the official documentation. A one page cheat sheet for keyboard shortcuts can be downloaded here.
This tutorial was written with Aseprite version 1.2.25.
Hello Worlds
Our first task is to locate the directory where Aseprite will look for Lua scripts that we’ve written. We do this by opening Aseprite and going to File > Scripts > Open Scripts Folder.

For Windows 10 users, this directory may be similar to C:\Users\MyUserName\AppData\Roaming\Aseprite\scripts. If we create a new file in that directory called helloWorld.lua, then return to Aseprite and select the Rescan Scripts Folder option, helloWorld should now appear in the Scripts sub-menu.
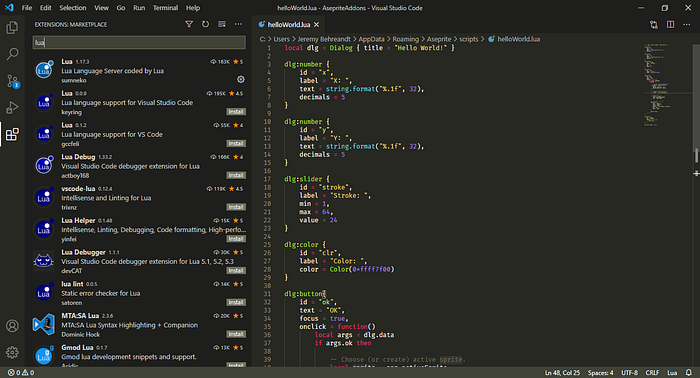
To make something happen when we select helloWorld in that menu, we need to open the file and start coding. Any code editor will suffice. Some popular choices are Atom, Notepad++ and Visual Studio Code. Most have an “extensions,” “add-ons” or “plug-ins” feature which allow greater Lua language support.
Dialog Box
Next, we’ll make a dialog box appear when the helloWorld script is selected. This dialog will have a title, a slider labeled “Percent,” a color selection widget labeled “Color,” a combo box labeled “Weekday” and a “Cancel” button that prints “Goodbye!” in the console when the dialog closes.

We refer to the Dialog object in the API to accomplish this. The API documentation is separate from the general user’s manual. It consists of Markdown (.md) files, and can be downloaded as a .zip for convenience. The same code editors as mentioned above also have extensions for viewing formatted .md files.
We use Lua’s table syntax, curly braces { and }, to call dialog methods because we can label each argument that we pass to a method with a named parameter followed by an equal sign = . Arguments that we do not specify fall back to a default.
After we create a Dialog, we assign an instance to a local variable dlg. The local keyword limits the scope of the variable. Because the methods which create a slider, color selector and combo box are instance methods of dlg, we call them with a colon : rather than a dot .. The colon syntax implicitly passes the dlg instance as the first argument into the method as self.
The first input, a slider, works on integers with a min (minimum) and max (maximum). If we wanted real number inputs, or didn’t have a bounding range, we could use a number input instead.
The color picker input works with a Color object. Above, we’ve created a color by supplying the red, green, blue and alpha channels in the range [0, 255]. We could also construct a color using hue, saturation and value (HSV); hue, saturation and lightness (HSL); or an ABGR hexadecimal, such as 0xffccbbaa. There is a shades input if we wish to handle multiple colors.
The combo box works with a table of strings that acts as an enumeration. The option parameter specifies the selected option, while the options parameter specifies the possibilities.
The button method’s most important parameter is onclick, where we will define a function of our own to be called when the button is clicked. In this case we print, then close the dialog. Whenever a Lua script contains at least one print call, the Aseprite console will appear. Text in this console cannot be selected or copied.
Last but not least, we need to call show for the dialog to appear.
Still Image
Now let’s create a dialog that uses inputs to change a sprite’s canvas. We’ll draw a large blue dot with the pencil tool.

The number dialog’s text parameter requires a string. To accomplish this we supply a number as the second argument to string.format. The first argument, "%.1f" specifies the decimal places to print, 1 in this case. The number method’s decimals parameter is the maximum decimal places before the number is rounded.
To read the information from the dialog, we cache dlg.data. The fields in args correspond to the ids we provided to dlg:color, slider and number .
We access information about the Aseprite editor via the variable app. A dialog window may be opened before a new Sprite is even created. For that reason, we select the app.activeSprite; if it is nil, we create a new Sprite.
After we have access to a Sprite, we create a new Layer and Cel. The sprite should already have a layer, but we’re establishing a habit of always creating a layer so as to not interfere with any work done prior to the script execution.
A cel is an image on a layer at a given frame of animation. The term is inherited from traditional animation, where cel is short for celluloid. A cel should not be confused with a frame. As the documentation explains, “a frame is the set of cels for all layers in a specific time.”

The relationship is easier to understand by looking at the Aseprite GUI, where layers are the rows in a 2D grid. Frames are the columns; in the example above, labeled 1, 2, 3 and 4. Cels are formed at the intersection of the two.
To govern the size and shape of the pencil stroke, we create a Brush. (We could’ve used app.activeBrush if it didn’t matter.) With that we have most of the ingredients needed for app.useTool. This method corresponds to the tools on the right side of the GUI. We select which tool to use with a string, "pencil" in this case. To tell the tool where to go on the sprite, we need a table of Points, which are created from an x and y.
The app must be refreshed for the changes made by the script to be visible. The steps taken by the script are registered in the history and can be undone by going to Edit > Undo or by using the shortcut Ctrl+Z.
Animation
With a basic understanding of frames and cels under our belt, let’s make an animation. Below is a pink circle orbiting around a central point.

Because the origin is in the top left corner and the y axis points downward, a positive angle results in clockwise rotation.
To simplify, we’ve assumed that this animation will run in a loop, where the animation returns to frame 1 after reaching the last frame.
An existing sprite may already contain multiple frames, so we account for that when deciding whether to create new ones with sprite:newEmptyFrame in a for loop. In Lua, loops and array indexes begin at 1 and end at the upper bound inclusive.
The duration of each Frame can be set if desired, but again, we have to be mindful of the impact this has on other animations that were set prior to the script’s execution.
We convert each iteration through another for loop to an angle in radians using Lua’s math library. The library contains the constant pi, as well as the usual trigonometric functions, cos and sin.

The onion skin can be toggled by going to View > Show Onion Skin, or by clicking on the window icon that casts a shadow in the timeline, to the right of the sliders icon.

The sliders icon opens a window that allows the onion skin to be adjusted further. The includes tinting future cels blue and past cells red.
Pixel By Pixel
For our third and final introductory script, let’s code pixel-by-pixel.
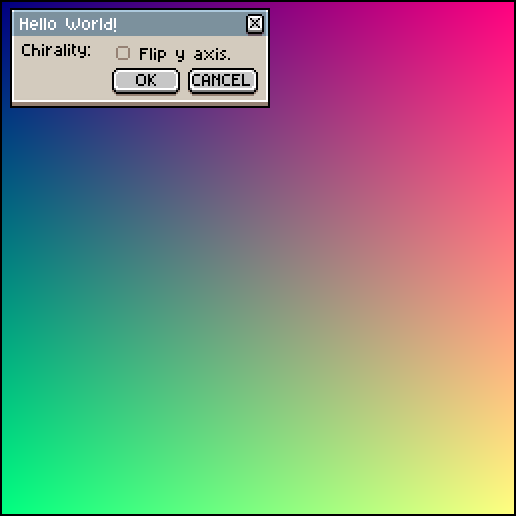
The dialog uses a check box to provide the user a choice to flip the y axis so it points up. We assume that the sprite is in RGB color mode, not indexed color or grayscale.
We acquire an Image from the cel. We then get a pixel iterator from the image via the pixels method. We retrieve the pixel’s coordinates from each element returned by the iterator. Alternatively, we could increment an array index i, then convert the one-dimensional index to two dimensional coordinates with x = i % w and y = i // w. For y, we use floor division to avoid overflow. The coordinates are in turn converted to red and green.
To flip the y axis, we subtract the green channel from 255; in other cases, however, we may have to negate y or subtract y from the height of the image.
Since we are setting colors in bulk, we use integers, not Colors. We may either use app.pixelColor or bitwise operators. Assume a color channel is an integer in [0, 255]. The right shift << by 0x18, 0x10, 0x8 or 0x0 in hexadecimal (24, 16, 8 or 0 in decimal) places the value in the correct slot. The inclusive or | composites the channels together. In the example above, alpha and blue are constants — 255 and 128, respectively — so they can be expressed as 0xff800000.
For grayscale images, the alpha channel is shifted right by 8 bits, then composited with a gray value, e.g., local c = a << 0x8 | v.
Readers who need to change the color mode through script should research app.command.ChangePixelFormat. The method is undocumented, so forum threads and the source code are the best references.
Lua Crash Course
Now that we’ve wet our feet, let’s better acquaint ourselves with Lua the programming language. Advance warning: the detail below can be dry. Readers may wish to skip this section, look at the more in-depth examples that follow, then return if still interested.
Syntax
Much of Lua’s finer points can be learned from the official Lua documentation. We’ll highlight syntax that may confuse coders from other languages, such as C#, Java, JavaScript and Python.
- A single line comment is initiated with two hyphens
--.//and#are reserved for floor division and length operators. There is no unary decrement for a number by one,--i. - Lua is dynamically typed, like Python and JavaScript. The
typemethod can be used to find a variable’s type as astring. numbers are 64-bit precision, equivalent tolongs anddoubles.- The value for absence is
nil, notnull. booleans, notbools, aretrueorfalse, all lower-case.- Inequality is signaled with
~=, not!=. Unary not is~for bitwise operations; there is no!. Bitwise exclusive or (xor) is also~;^is reserved fornumberexponentiation. %is floor modulo, not truncation modulo. Lua is like Python in this regard; it is unlike C#, Java and JavaScript. In shader language terminology,%ismod, notfmod.- The
mathlibrary’stypemethod distinguishes between anintegerand afloat.tointegertruncates a real number to an integer.randomis also found in this library. - The concatenate operator is
... Forstrings,"a".."b"yields"ab". - Multi-line strings are written with square brackets,
[[and]]. tables are Lua’s fundamental collection. They are similar to associative arrays.- The
#operator can be used to find the length of atableserving as an array. Beware, this operator examines boundaries within a table. See the documentation, section 3.4.7. - Curly braces,
{and}, signal a table; for example,{ 1, 2, 3 }for an array and{ x = 1, y = 2, z = 3 }for a dictionary. tablearray subscript accesses with[and]begin at1and end at#arr. The upper bound is inclusive, not exclusive.ifandelseifconditionals must be followed bythen; this is not needed forelse. The whole block concludes withend. For exampleif a > b then a = 1 elseif a < b then b = 1 else a = 0 end.forloops follow the familiar tripartite structure. The comparison in the second portion and increment in the third are implied. A loop clause is initiated withdoand concluded withend. For examplefor i=1,#arr,1 do print(arr[i]) end. The upper bound is inclusive.
Points 14 and 16 above make iterating over closed loops, such as the vertices in a polygon, cumbersome compared to other languages. In such cases, we may wish to access the previous and next element in an array at any one step in a for loop. We can work with syntax such as the following.
The ipairs method is used to iterate over tables treated as arrays.
The pairs method can be used for tables treated as dictionaries.
The ordering of key-value pairs will not be preserved. The above prints out ["Medium"] = 2 ["Hard"] = 3 ["Easy"] = 1.
Next, we’ll look at object orientation in Lua. Object oriented programming will allow us to separate capabilities, test them individually, then reuse them across multiple Aseprite plugins without repeating ourselves.
Object Orientation
The most important note on the Aseprite API relative to object orientation is this: The use of require("myclass") to reference one class file within another is not supported; use dofile("./myclass.lua") instead.
Lua is not inherently object oriented, but classes can be simulated with metatables and metamethods. For our purposes, the mechanics will be treated as boilerplate, used without explanation. We work off the following template:
For each new class we define, the parameters x and y in the method new will be updated.
The dot-method syntax for calling a function that belongs to a class is supplemented with a colon syntax. A method defined or called with : supplies self as its implicit first parameter. Like Python, Lua uses the self keyword, analogous to this in C#, Java and JavaScript. For this reason, : is useful to distinguish instance from static methods. In cases where Lua complains of a nil value in a method call, check that a : shouldn’t be a ..
Metamethods are prefixed with a double underscore, __; it is through these that Lua supports operator overloading.
Do not be seduced by the allure of minimal syntax with operator overloading. Overloading can lead to problems with clarity in any language, but especially in dynamically typed languages.
For 2D vectors, multiplication could reasonably be assumed to be the dot product, component-wise multiplication between two vectors, or the scaling of a vector by a number. The length of a vector could be its magnitude; or it could be the number of components, 2, to distinguish it from a 3D or 4D vector. For those reasons, the metamethods above are backed by another method with a documentation comment.
For those who do want to utilize this capability, arithmetic operators are in the table below.
Should we wish to create a custom color object, bitwise operators are
These operators are a relatively new addition to Lua, so check which version any tutorial or documentation is using when researching these.
If we wanted to create a hash from a decimal, we could use these operators in conjunction with string.pack and unpack. For example, string.unpack("j", string.pack("n", 0.123)).
Comparison operators are __eq for ==; __le for <=; and __lt for <. The >= and > operators are inferred.
The aforementioned .. is __concat. # is __len. Getting and setting by index are defined by __index and __newindex.
To change how an object is printed to the console, override __tostring. More on the options in string.format can be found in this Stack Overflow discussion. Lua follows conventions established by C.
Shape Making
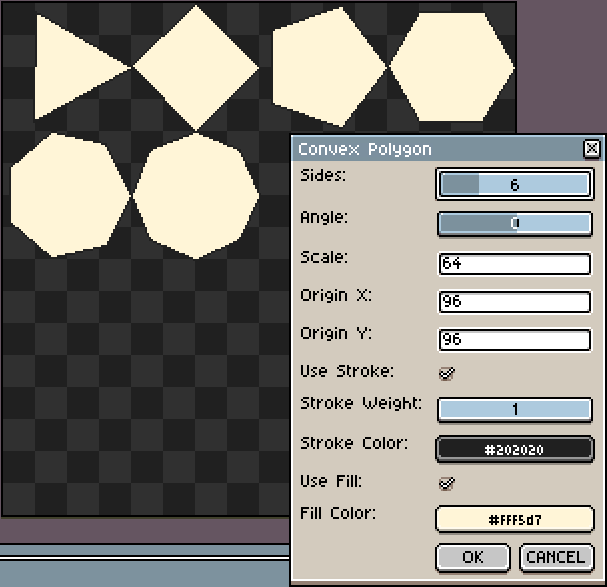
As we saw earlier, we can draw a shape by supplying a table of Points to app.useTool. The x and y coordinates provided to a Point constructor are truncated to integers. This makes sense for a pixel art editor, but will complicate matters when it comes time to draw certain shapes — see for example the left sides of the triangle and diamond above.
To make drawing shapes easier to handle, we’ll create a Mesh2 class; within this class, we concern ourselves only with making a shape in orthonormal unit space, [-0.5, 0.5], where coordinates are stored in Vec2s. The shape can be scaled up to pixel size later with a Mat3 class.
A Mat3 Class


The Mat3 class uses nine loose real numbers. Some readers may prefer that these be stored in a 1D or 2D table. The parameters are in row-major order. The last row — m20, m21 and m22 — is not used for 2D transformations, so it may be omitted and a 2×3 matrix used instead.


To create affine transformations — translation, rotation and scale — we write the following three methods.
The fromScale method checks that input dimensions are nonzero. Shear or skew matrices may also be of interest to the reader; more about them can be found at the Wikipedia entry on affine transformation.
Affine transformations are combined via matrix multiplication.
This matrix multiplication is sensitive to order; for example, translation · rotation · scale (TRS) yields a different result than scale · rotation · translation (SRT).
A Utilities Class

To transform a Vec2 by a Mat3, we multiply them. The matrix is the left operand and the vector is the right. To avoid any complications over where this method is stored, we stick it in a general utilities class.
For multiplication, a Vec2 is treated as a 3×1 matrix. A third component is appended. When the Vec2 represents a point, this third component is 1. Since a.m02 * 1 and a.m12 * 1 are meaningless operations, this is omitted. Given that the last row of a 3×3 matrix goes unused in 2D transformations, the variable w should equal 0 * b.x + 0 * b.y + 1, i.e., just 1. Those who prefer a 2×3 matrix can leave this out entirely. Above, Squirrel Eiserloh provides a great talk on the concepts behind this transformation.
A Mesh2 Class
The mesh class is composed of a table of Vec2s and a 2D table of integers that act as indices to access the Vec2s in the appropriate order.
The indices are in a 2D array because a mesh could contain a variable number of vertices per face. For example, a mesh depicting a house might contain one triangle for the roof (3 vertices per face) and one square for the front wall (4 vertices per face).
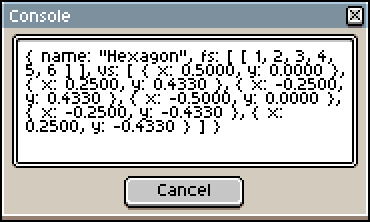
The __tostring method is included due to its importance to debugging. Do not assume that, because our end goal is a visual, a verbal output won’t help us solve problems we encounter. Above is an example print-out for a hexagon.
To transform a mesh, we loop through vs and multiply each coordinate. transform is an instance method. It returns itself to allow method chaining.
A regular convex polygon follows the same pattern as the animated hello world from above. We convert each sector to a polar coordinate by multiplying it with 2π (6.28319) over the total number of sides. Then we convert from polar to Cartesian coordinates. To create an n-gon we only need one face, with one vertex per sector.
Drawing the Mesh
We create another utilities class that interfaces with the Aseprite API. In this class, we define a method to draw a shape fill with the "contour" tool and draw a shape stroke with the "line" tool.
app.transaction is the most important concept to understand in this code snippet. Aseprite records a history of actions taken to change a sprite; this history can be viewed through Edit > Undo History.

transaction allows the coder to group together multiple actions into a single entry in this history. This allows a coder to avoid flooding the history with a script. Furthermore, a coder may anticipate what stages of a process the user would want to undo or redo. In the case above, we created two transactions, one for a shape fill and one for a shape stroke. This design decision in turn impacts the code structure, as we could’ve used fewer for loops had we permitted only one transaction.

To correct the precision issue that arises from truncation of Vec2 numbers to integers, we need a rounding function.
Lua does not have a math.round method, so we roll our own with a bias of positive or negative 0.5, depending on the number’s sign.
Putting It All Together
Now we consolidate these efforts into a dialog script. We separate out default initial values into their own table at the top of the script so that we can easily change them.
To transform the mesh appropriately, three matrices are multiplied in TRS order. The strokeWeight is used to construct a Brush.
A Dimetric Grid
Let’s make something more useful than a convex polygon. Since isometric projection is popular in city builder and 4X genres of video games, let’s create a grid to serve as a guidelines.
Before we continue, note that Oscar Bazaldua has created an isometric guidelines script that permits custom rise and run; OpsisKalopsis has written scripts to skew square tiles into isometric sides; and Darkwark made a script to generate colored isometric boxes. So there are multiple references for how this can be done.
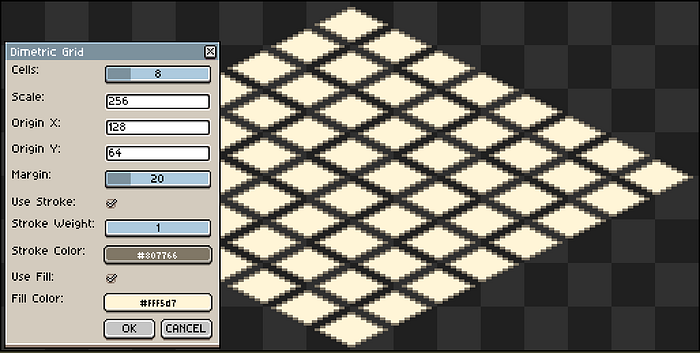
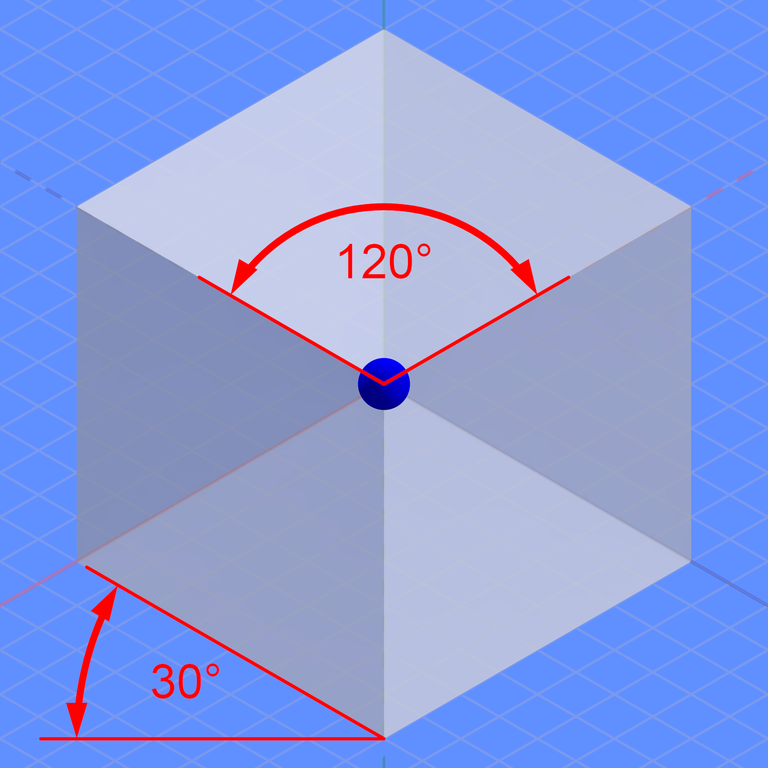
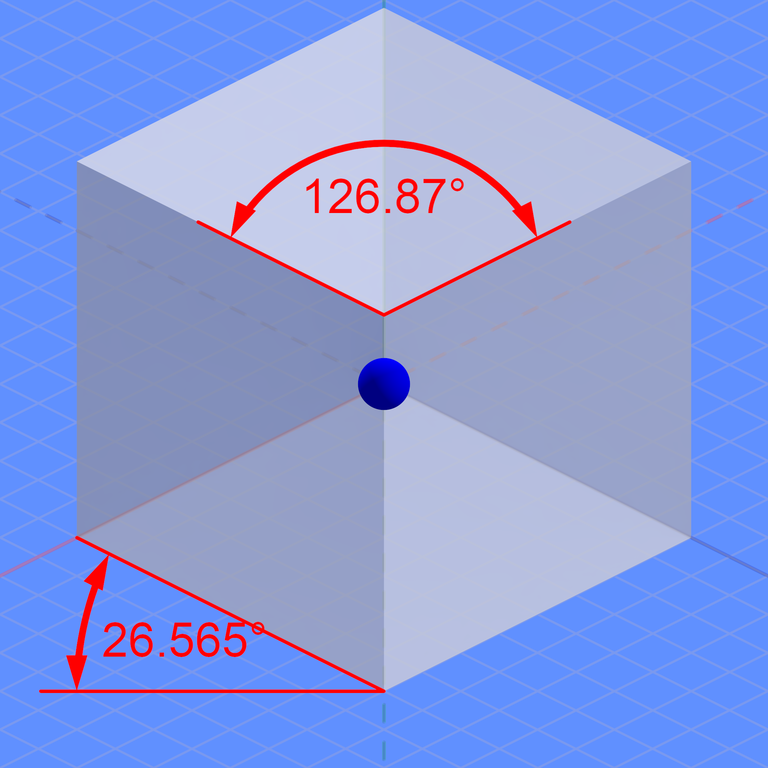
In pixel art, limited resolution and aliasing mean that it is conventional to use a dimetric projection that approximates isometric. As the Wikipedia article on the subject explains, rising 1 pixel vertically for every 2 horizontal pixels yields an angle of approximately 26.565 degrees, or 0.464 radians. This can be checked by printing the results of math.atan(1.0, 2.0).
True isometric projection rises 1 pixel vertically for every √3 (1.7321) horizontal pixels, creating a 30 degree angle. The interior angles of the 2D hexagon formed by the projected 3D cube are 120 degrees in true isometric, while they are approximately 126.87 and 116.56 degrees in dimetric.
Our approach will be as follows: first, we create a Cartesian grid; then, we rotate it by 45 degrees; then we squish it in half on the y axis. We also have to factor out the diagonal of a square, so we scale by 1/√2, 0.7071.

This transform is simpler than it may first seem if we do the math, since both the sine and cosine of 45 degrees are √2.
To create a Cartesian grid, we write the Mesh2 method below.
The dimetric grid follows from this.
To pad each cell in the grid, we need to deal with the fact that any one cell may share its corners with another. (This is not always the case, as when the cell is in the corner or on the edge.) To ensure that each face has a unique copy of the data, we code the following.
We then write a method to scale each mesh face individually.
To do so, we calculate the median center for each face. We sum a face’s vertex coordinates, then divide by the number of vertices in the face. This median center is treated as a pivot. We subtract the center to orient a face’s vertex coordinate about the origin, scale the coordinate, then add the pivot back to return the face to its former location in the mesh.
This depends on three Vec2 methods we’ve not implemented above: all, scalar multiplication and vector subtraction. These should be self-explanatory.
We omit the dialog script here, as its construction is similar to what we did earlier to create a polygon dialog.
A Conic Gradient
Let’s switch from shape making to pushing pixels. Aseprite has a linear and radial gradient, but not a conic gradient, so let’s make our own.
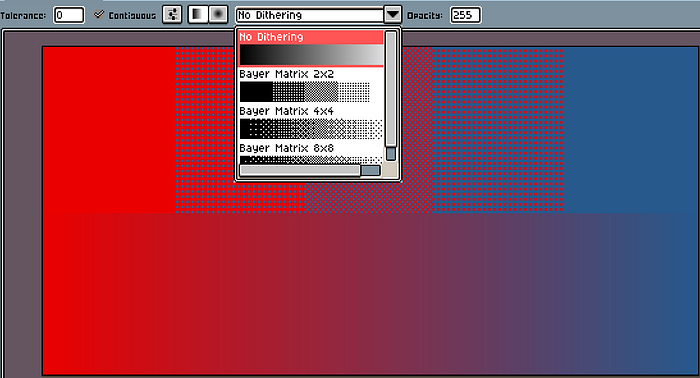
Unlike the built-in gradients, the script below won’t cover the application of a dithering matrix. To compensate, we’ll add a feature not available in the built-in gradients: HSV interpolation mode.


This is more complicated than standard RGB interpolation, as we have to define near and far easing between hues.
Near and Far Angle Interpolation
A hue is no different than an angle, so the easing methods can be generalized to accept either degrees in [0.0, 360.0], radians in [0.0, 6.2832] or a factor in [0.0, 1.0]. We’ll place these easing methods in Utilities.
The Aseprite API does not expose any color mixing methods in either app.pixelColor or in the Color object. We’ll have to write our own.
Lerp RGBA and HSVA
We’ll be receiving Colors from the Dialog, so we can unpack them into their constituent elements once, before we loop through a Sprite’s pixels. Within the pixel loop, we’ll want to pack the result into an integer. Let’s put the color mixing methods in AseUtilities.
A more complex method could access a sprite’s ColorSpace, then if necessary convert a color from standard RGB (sRGB) to linear RGB, interpolate, then convert back to sRGB. John Novak’s article “What every coder should know about gamma” offers a primer on the topic.
For HSVA mixing, we have to define our own RGBA to HSVA conversion, even though this is likely a duplication of effort. We do this to avoid creating new Color objects.
To understand the outline of this method, it could be helpful to frame the RGB color wheel in a hexagon, then sector the hexagon into a triangle fan.

Depending on which sector, 0–5, a hue will fall into, one RGB color channel will dominate, and its contribution will be the color’s value: in sectors 1 and 2, green dominates; in sectors 3 and 4, blue; in sectors 5 and 0, red. A lengthier explanation can be found on Wikipedia.
Because these methods will be used within for loops, we omit precautions we might otherwise put in place, such as validating that the hue, saturation and value are in the proper range, and that the alpha channel has a default argument.
Dialog GUI
In the event we want to support more kinds of gradients in the future, we’ll separate the business logic of the gradient from the dialog box script.
Instead of using number inputs for the origin x and y, we used sliders in the range [0, 100]. These are intended to work as a percentage. We have to adjust the origin based on the aspect ratio of a sprite, as it will sometimes have a greater width than height or a greater height than width.
It’s possible to create a gradient that mixes a table of colors, not just between an origin and destination. However, the question would be how to make the selection of that gradient convenient to the user.
Business Logic
Our goal in the business logic of the conic gradient script is to execute a series of conversions. As before, we must convert the index in a pixel array to a 2D coordinate. We convert these coordinates from pixel scale to signed values in [-1.0, 1.0]. We then convert from Cartesian to polar coordinates with math.atan.
Once we’re in polar coordinates, we can convert from an angle to a factor through division by 2π followed by modulo. With a factor in [0.0, 1.0], we can find the color for that pixel index. The easing method and color mode will depend on the user’s selection.
Conclusion
Once we’ve finished developing a script, we can assign it a keyboard shortcut by going to Edit > Keyboard Shortcuts (Ctrl+Alt+Shift+K) and searching under the Scripts header in the Menus section.

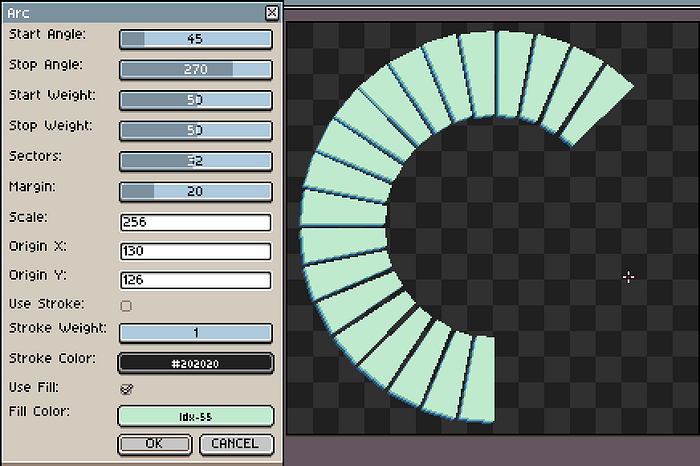
This tutorial has left several features of the Aseprite API unmentioned, such as commands and palettes. Could more be done with the modest beginnings in this tutorial? Sure. We could make arcs by synthesizing concepts learned from the conic gradient and mesh scripts above.
We could make hexagon grids by porting across concepts from a prior tutorial.

So long as we understand the logic beneath a script, the fact that it was written in a different language shouldn’t matter.


We could prototype magic spells, futuristic munitions or other particle effects more easily by scripting cel animation. Cels may contain custom user data; a script would assist in generating that data.
These examples, as well as complete scripts for the dimetric grid and conic gradient, can be found in a Github repository here. Readers may wish to challenge themselves to, for example, simulate artifacts from CRT screens; add chromatic aberration a cyberpunk-themed composition; or adapt a shader on ShaderToy to pixel art.
